At the core of our transaction system, we are handling tens of thousands of blockchain transactions every day, 24/7 and without interruptions. Delivering this without any reliable and independent connection to the blockchain would be pretty much impossible. For this reason, we decided to run our own network of cryptocurrency nodes for all of the coins we support on our platform. In this article, we are examining the way we are running this network of nodes and how we use different tools to provide a consistent and maintainable infrastructure.
Tooling FTW
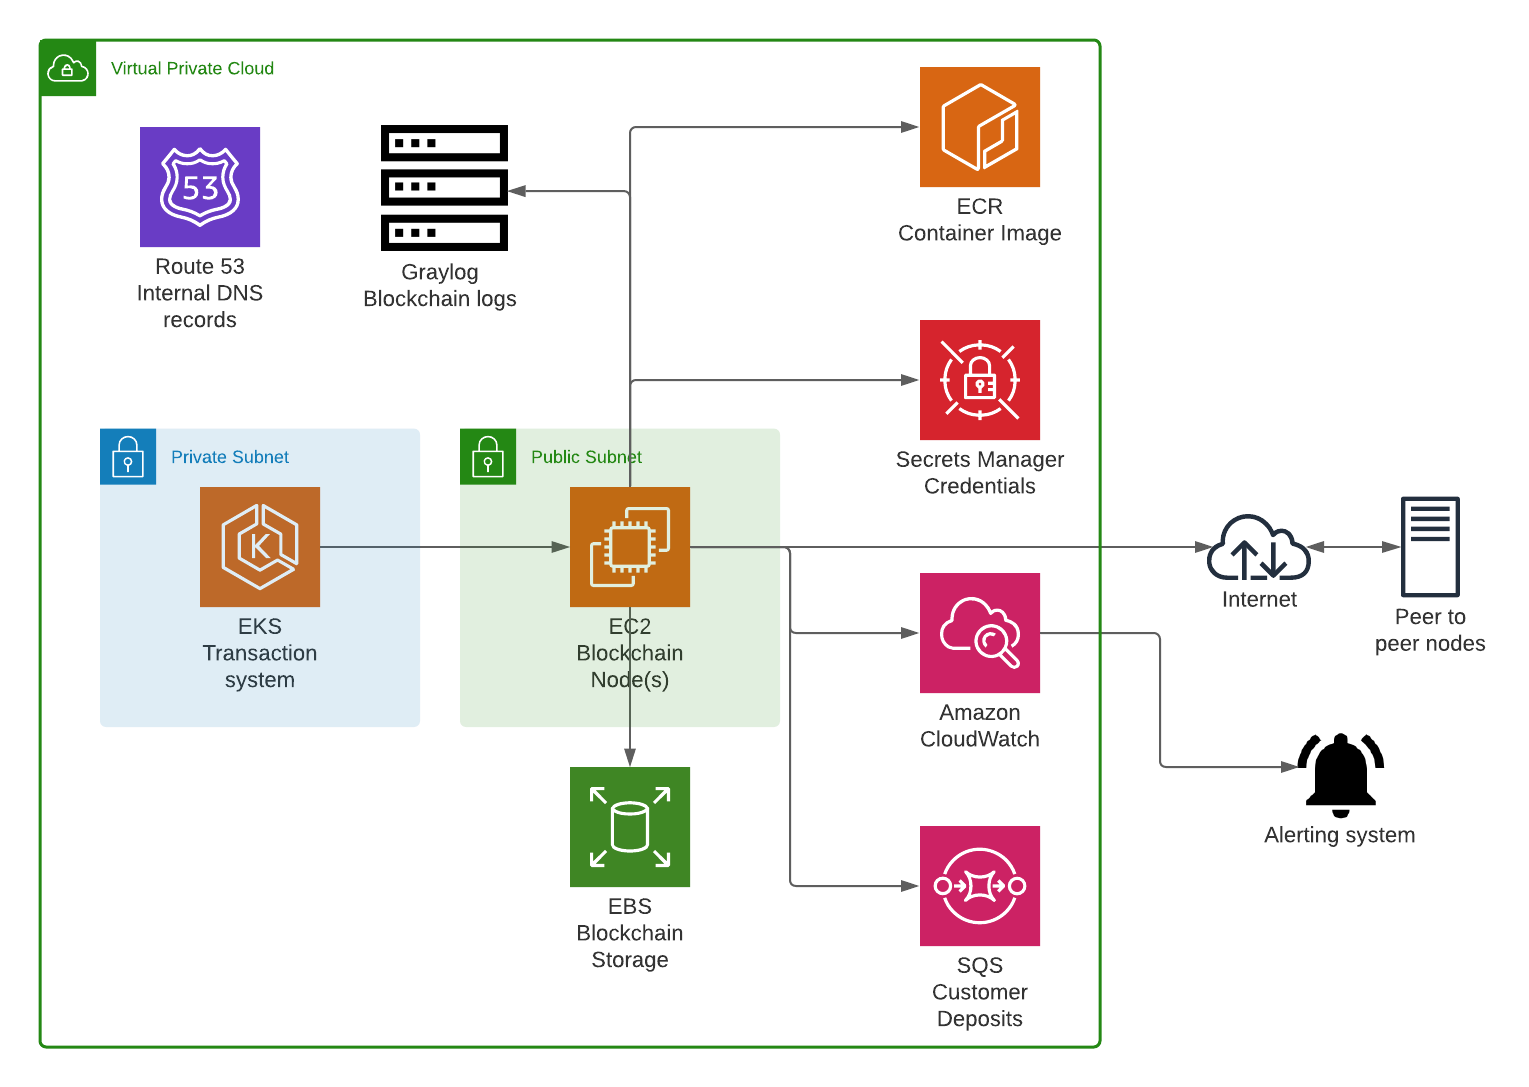
Since the inception of the Bitpanda platform, the choice to have our workload running in the cloud was a given. This gives us the flexibility to scale our systems indefinitely for our daily growing user base and allows us to frequently add new services. For this purpose, we are deploying our infrastructure in AWS, together with modern tooling and DevOps practices in place. Terraform, Packer, Docker and a reliable CI/CD, in our case Gitlab CI, are our main solutions for deploying our resilient cryptocurrency node infrastructure.
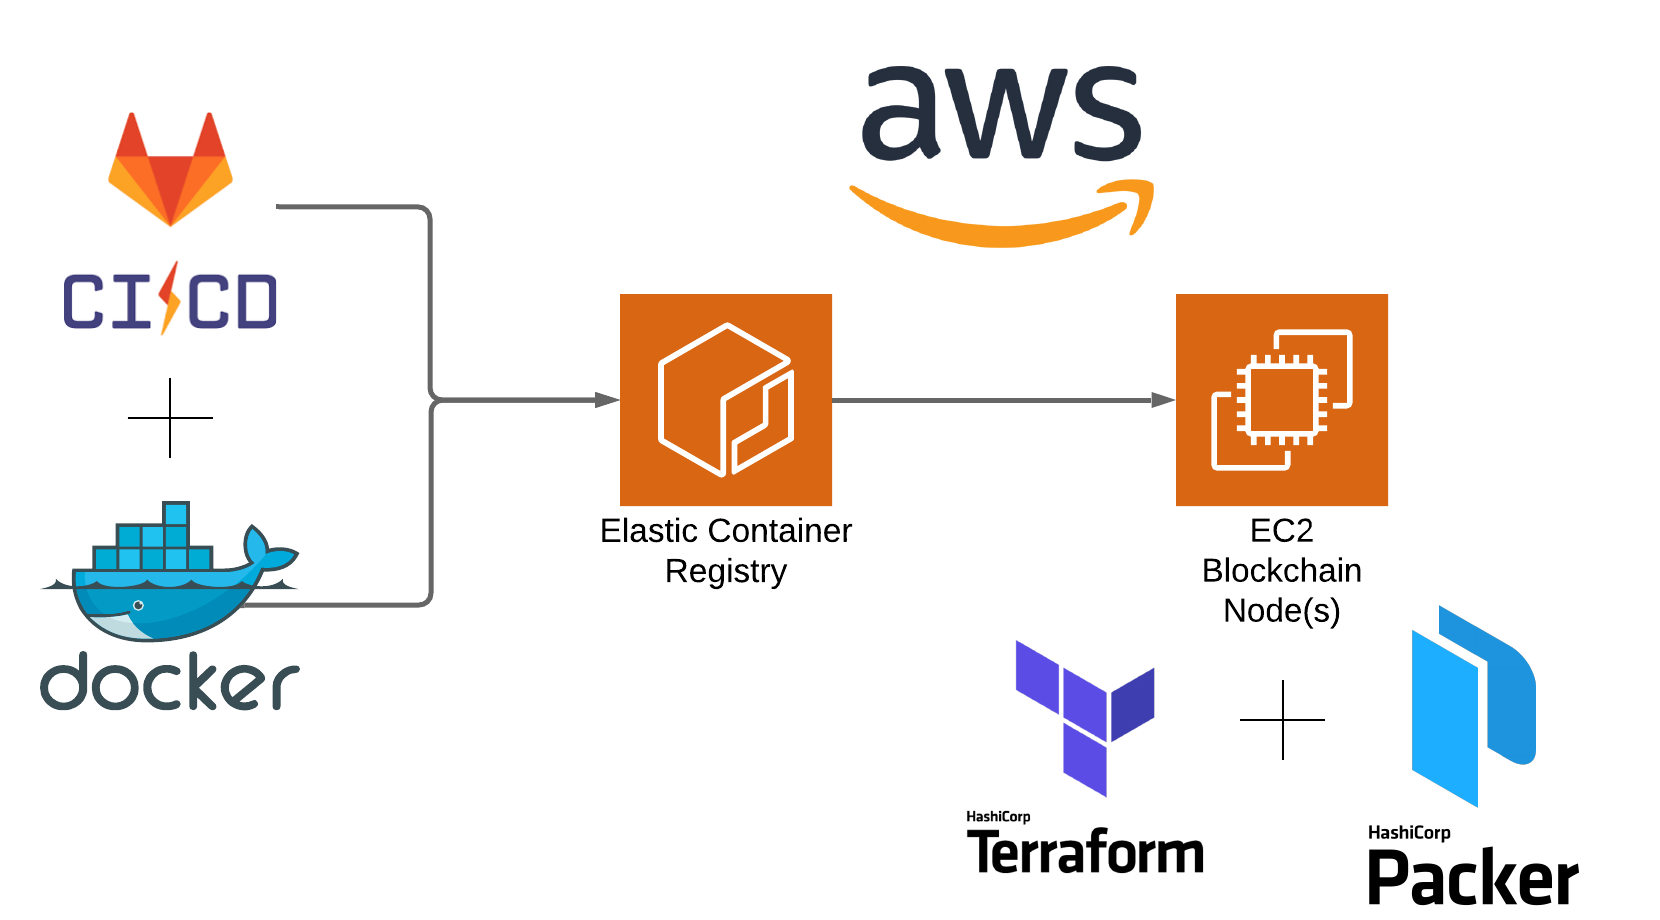
Combining these tools to build the containers with Gitlab CI, as well as deploying the infrastructure with Terraform and Packer, allows us to reuse our components and be faster and more reliable when deploying a new cryptocurrency node to our platform.
To Kubernetes or not?
Kubernetes has become the de facto industry standard for running containerized workloads and is also used for all the application workloads at Bitpanda. So it would have made sense to also run our cryptocurrency nodes in Kubernetes, right? Even though this is a valid point to make and it could have been implemented this way, we ultimately decided against it for the following reasons:
They need to be available 24/7 and always running in order to stay synched (i.e. be on the same block height as all the other nodes in the network) with the blockchain
Rescheduling or moving the pod to other nodes, would have been disastrous as some of the nodes take from minutes to hours to be resynched with the network after a restart, resulting in downtime for that coin on our platform
Some of the nodes have high hardware requirements, which would make us over provision the whole cluster in order to accommodate just some specific nodes in the Kubernetes cluster
Running a cryptocurrency node means running a stateful container as the blockchain needs to be persistent on an Elastic Block Store (EBS) volume in order to be available again after a restart and does not need to sync the blockchain from scratch. Even though Kubernetes can run stateful workloads, it would require extra work to maintain our automatic snapshot solutions for the EBS Volume and would not add any real value for the overhead
If no snapshot is used, adding a new node for a coin would take from hours to days and sometimes even weeks to be able to catch up with the other nodes in the network. So automatically adding/scaling a node is not something that would happen unplanned
As we did not want to lose the benefits of running workloads in containers, as with our other services, we decided to use Docker images together with Packer for building an Amazon Machine Image (AMI), where we can run our cryptocurrency node containers.
Containerize everything

All of our cryptocurrency daemons have their own project in our Gitlab and follow guidelines and naming conventions, so we can use the same CI templates and terraform module for each coin. Some of the important rules are that:
Every project needs the same folder structure in order for the CI/CD to build the correct Docker image
The Dockerfile should only contain the binaries and configuration in order to run the daemon, like bitcoind or hornet (IOTA) etc. Configuration options could include, for example, where to store the blockchain data or which port other nodes should use to connect to your node
All daemons have to have a version lock, either on the image itself or on the package/binary that is downloaded during the build process, so that we know exactly which version is running in the different environments
In order to make sure the binary was not changed during the download, the downloaded binaries need to be checked with a hashing algorithm for integrity after the download, if the repository provides this information
The following is an example of our bitcoin docker image:
FROM alpine:3.12.1 as builder
ENV BITCOIN_VERSION="0.20.0" ENV BITCOIN_URL="https://bitcoin.org/bin/bitcoin-core-${BITCOIN_VERSION}/bitcoin-${BITCOIN_VERSION}-x86_64-linux-gnu.tar.gz" ENV BITCOIN_ASC_URL="https://bitcoin.org/bin/bitcoin-core-${BITCOIN_VERSION}/SHA256SUMS.asc" ENV BITCOIN_PGP_KEY="01EA5486DE18A882D4C2684590C8019E36C2E964"
WORKDIR /build
RUN apk --update --no-cache add wget gnupg
&& wget -O bitcoin.tar.gz "${BITCOIN_URL}"
&& wget -O bitcoin.asc "${BITCOIN_ASC_URL}"
&& gpg --no-tty --keyserver keyserver.ubuntu.com --recv-keys "${BITCOIN_PGP_KEY}"
&& gpg --no-tty --verify bitcoin.asc
&& BITCOIN_SHA256=$(grep bitcoin-${BITCOIN_VERSION}-x86_64-linux-gnu.tar.gz bitcoin.asc | cut -d" " -f1)
&& echo "${BITCOIN_SHA256} bitcoin.tar.gz" | sha256sum -c -
&& tar -xzvf bitcoin.tar.gz -C ./ --strip-components=2 "bitcoin-${BITCOIN_VERSION}/bin/bitcoind"
&& rm -rf bitcoin.tar.gz bitcoin.asc
FROM debian:buster-slim
WORKDIR /node
COPY --from=builder /build/bitcoind /usr/local/bin/bitcoind
COPY bitcoin.conf . COPY docker-entrypoint.sh /usr/local/bin/entrypoint
RUN mkdir data
&& groupadd -r bitcoin
&& useradd --no-log-init -r -g bitcoin bitcoin
&& chown -R bitcoin:bitcoin /node
USER bitcoin
ENTRYPOINT ["entrypoint"]
After the docker image is prepared, our automatic CI builds the image and tags it with the corresponding ENV version number from the Dockerfile and pushes it to ECR in AWS.
<account_id>.dkr.ecr..amazonaws.com/bitpanda/coin-daemons/bitcoin:0.20.0
As some of the nodes would take very long to catch up with the network, we implemented custom entry points to check if the data volume is empty and download a snapshot in order to speed up the sync with the network. Using these snapshots means, should we need to resync because of a network upgrade or something similar, we can be back in sync for our customers in minutes instead of days.
Stable foundation
Now that we have the Docker image ready, we can continue our preparation for the host of the system. We choose Packer as our go-to tool for creating our custom-built AMIs and Amazon Linux 2 for our base image for all of our self-managed servers. For monitoring purposes, we include the CloudWatch agent in the image, so apart from CPU and memory usage, we can gather extra metrics like EBS volume usage and metrics from the Docker daemon. These metrics are exported every minute to CloudWatch and enable us to set thresholds and alarms. The container itself is managed via a custom systemd unit, which acts as a supervisor process for managing our Docker container.
[Unit] Description=Cryptocoin node for connection to the blockchain Requires=docker.service After=docker.service
[Service] User=ec2-user EnvironmentFile=/etc/sysconfig/node ExecStartPre=/usr/local/bin/login-ecr ExecStartPre=/bin/docker pull ${IMAGE}:%i ExecStart=/bin/docker run --restart=always --env-file=/etc/opt/node-config --name=${COIN}-node -p ${PORTS} -v /node-data:${DATA_VOLUME} ${IMAGE}:%i ExecStop=/bin/docker stop "${COIN}-node" ExecStopPost=/bin/docker rm "${COIN}-node" ExecReload=/bin/docker restart "${COIN}-node" Restart=on-failure
[Install] WantedBy=multi-user.target
What is important to note here is that the EnvironmentFile gets populated by the user init script from terraform, so we can provision the mount directory and image dynamically, based on the information provided from our custom terraform module, which we will explore in the next section. Also, the custom parameter for the image version allows us to change the image we want to run with a simple command as:
$ sudo systemctl start [email protected]
which would start up the image tagged with version 0.20.0 from our previously-created Docker image.
Let’s spin up our first node!
After both the Docker image and the AMI is built, we are now able to use Terraform to spin up the blockchain node. For this purpose, we custom built our own module so we can reuse the same code for all of our nodes. Here is an example:
module "bitcoin" { source = "./modules/nodes"
coin_name = "bitcoin" image_id = var.node_ami_id
vpc_id = data.aws_vpc.vpc.id availability_zones = data.aws_availability_zones.zones.names subnet_ids = data.aws_subnet_ids.nodes.ids domain_intern_zone_id = data.aws_route53_zone.internal.zone_id
instance_type = "c5.large" nodes_num = var.nodes_num
root_volume = 16 ebs_size = 500
rpc_ports = [ 5000 ]
p2p_ports = [ 5001 ]
has_secrets = true
host_config = { DATA_VOLUME = "/node/data" }
container_config = { RPC_PORT = "5000" PORT = "5001" ... }
custom_metrics = { Component = file("${path.module}/custom-metrics/metrics.sh") }
tags = merge( { Component = "nodes/bitcoin" }, var.tags ) }
So let's take a closer look at what it is happening here exactly:
Lines 4-5: First we define the name of the coin and specify the AMI we got from running the Packer configuration from the previous paragraph
Lines 7-10: The network configuration is then specified. The nodes need to run in a public subnet and need a public IP address in order to enable peer-to-peer connections. If we are running more than one node of a specific coin, we also have to specify the availability zones (AZ), so the nodes can be spread out over different AZs in case one of the zones is unavailable
Lines 12-13: As each node has different hardware requirements, we are using different instance types, but sticking mostly with the c family for compute-intensive tasks
Lines 15-16: The storage amount for the EBS volume is dependent on the current size of the blockchain and is constantly increasing as the blockchain increases, for example, the Bitcoin blockchain is currently - at the time of writing - at around 360 GB
Lines 18-20: In these lines we are defining the RPC (Remote Procedure Call) ports, which are only exposed to our internal network. These ports allow our system to send and receive transactions to and from the blockchain. The communication here is mostly done through either HTTP, Websockets or some nodes even provide a gRPC endpoint
Lines 22-24: These lines define the peer-to-peer ports, which are needed for the node to keep in sync with the network, so they can receive and send transactions to the network
Line 26: Some of the nodes provide the option to use an RPC password for connecting to the node, or some need a password to connect to a data store. If this is the case, we need to create a secret in AWS Secrets Manager where the instance has access to and can pull the latest secret environment variables from
Line 28-36: Host and container config specify the environment variables for both the host and the docker container (more information in the init section)
Line 38-40: As we need to know if the blockchain node is in sync we need to inject custom scripts for each node to post the metrics to CloudWatch
After applying the module with terraform the following resources are created in AWS:
The specified number of EC2 instances, with an associated public IP
A Route53 entry in the form of node.. for each node. For example, in the case above node1.bitcoin.internal
CloudWatch alarms for monitoring metrics
EBS volumes for storing blockchain information, including automatic snapshots with AWS Data Lifecycle Manager
AWS Secrets Manager secret for storing sensitive credentials
User data at work
During the first boot of the module, the init user data script provides some important functionality for bootstrapping the node:
It populates both the host and container configuration, which is used by the systemd unit mentioned before, including secrets from the secret manager (if any)
It updates the CloudWatch agent profile with the name of the node, so it can be identified in CloudWatch
It attaches the EBS blockchain data volume to the instance and creates the file system if it is the first boot
It sets up log forwarding to our internal Graylog instance
After all the previous steps are executed successfully, the systemd unit is started
If we are now connecting to our newly-built node, we can verify this via our custom systemd unit to see if we have a working bitcoin node.
$ systemctl status [email protected] ● [email protected] - Cryptocoin node for connection to the blockchain Loaded: loaded (/etc/systemd/system/[email protected]; disabled; vendor preset: disabled) Active: active (running) since Mon 2020-10-19 18:16:41 UTC; 6s ago Process: 14382 ExecStopPost=/bin/docker rm ${COIN}-node (code=exited, status=0/SUCCESS) Process: 14277 ExecStop=/bin/docker stop ${COIN}-node (code=exited, status=0/SUCCESS) Process: 14414 ExecStartPre=/bin/docker pull ${IMAGE}:%i (code=exited, status=0/SUCCESS) Process: 14395 ExecStartPre=/usr/local/bin/login-ecr (code=exited, status=0/SUCCESS) Main PID: 14424 (docker) CGroup: /system.slice/system-node.slice/[email protected] └─14424 /bin/docker run --restart=always --env-file=/etc/opt/node-config --name=bitcoin-node -p 5000-5001:5000-5001 -v /node-data:/node/data <account_id>.dkr.ecr..amazona...
Oct 19 18:16:48 docker[14424]: 2020-10-19T18:16:48Z Loaded best chain: hashBestChain=0000000000000000000994d2a304865b29f4ceab3be7044...=0.999565 Oct 19 18:16:48 docker[14424]: 2020-10-19T18:16:48Z init message: Rewinding blocks... ...
Monitoring never goes out of style
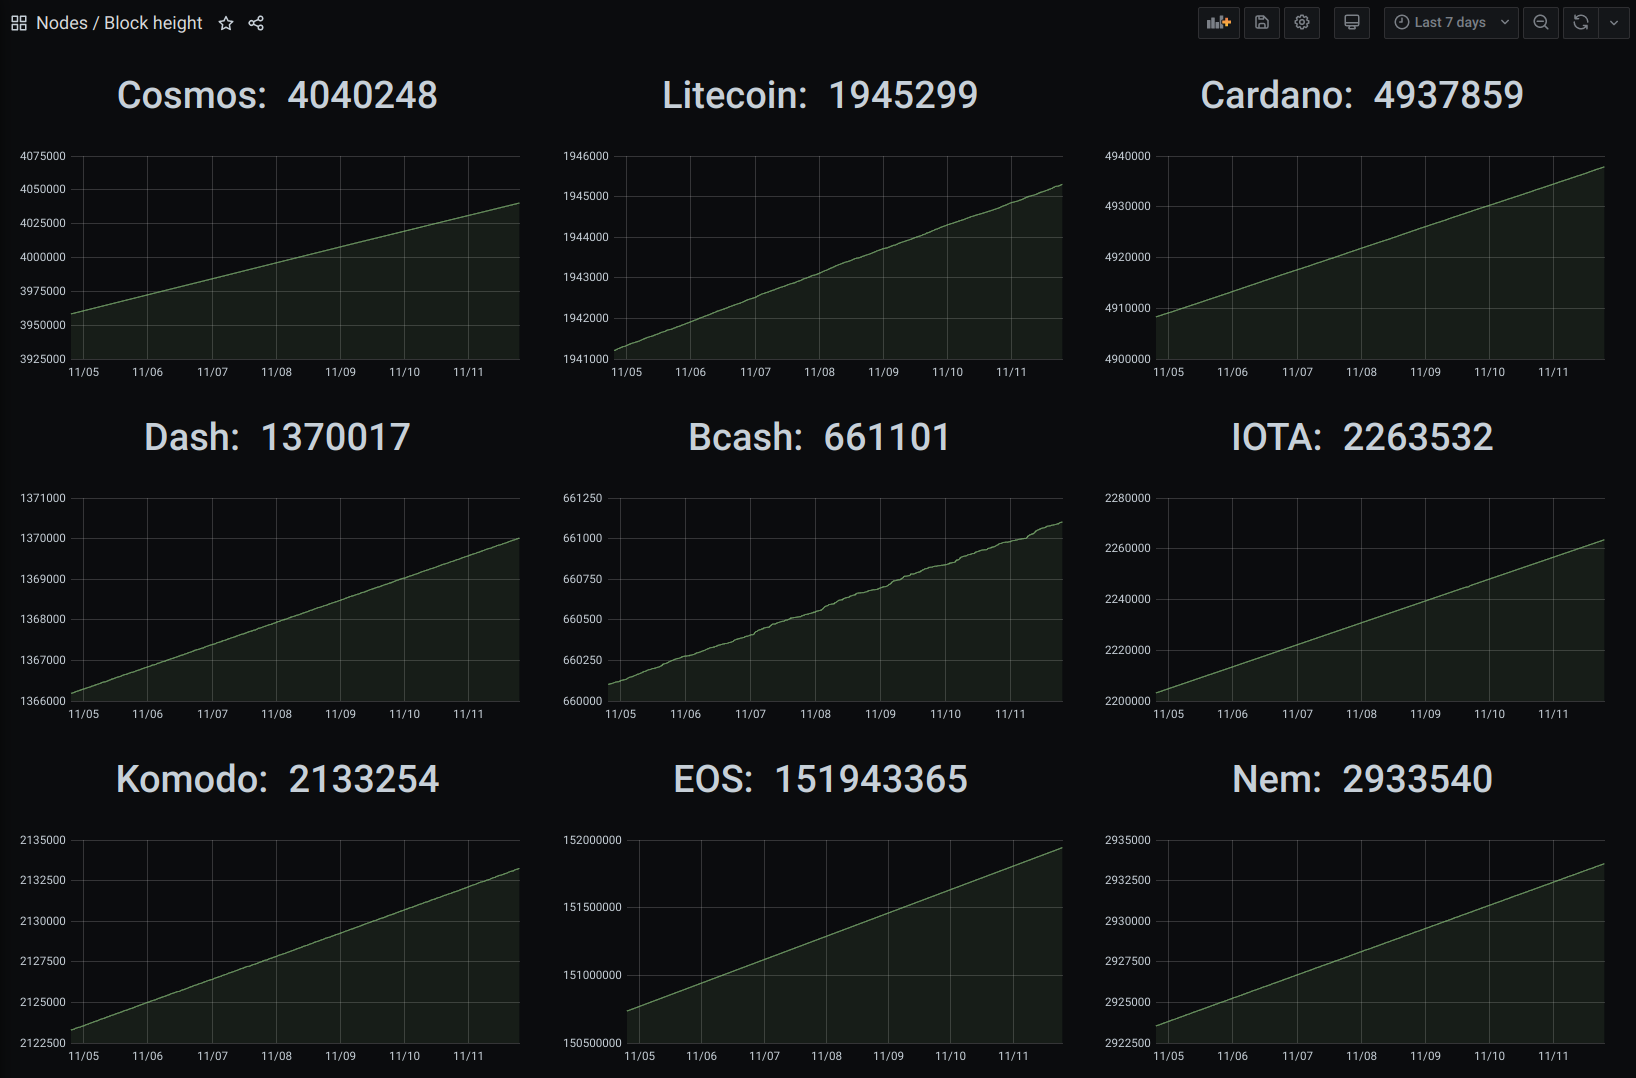
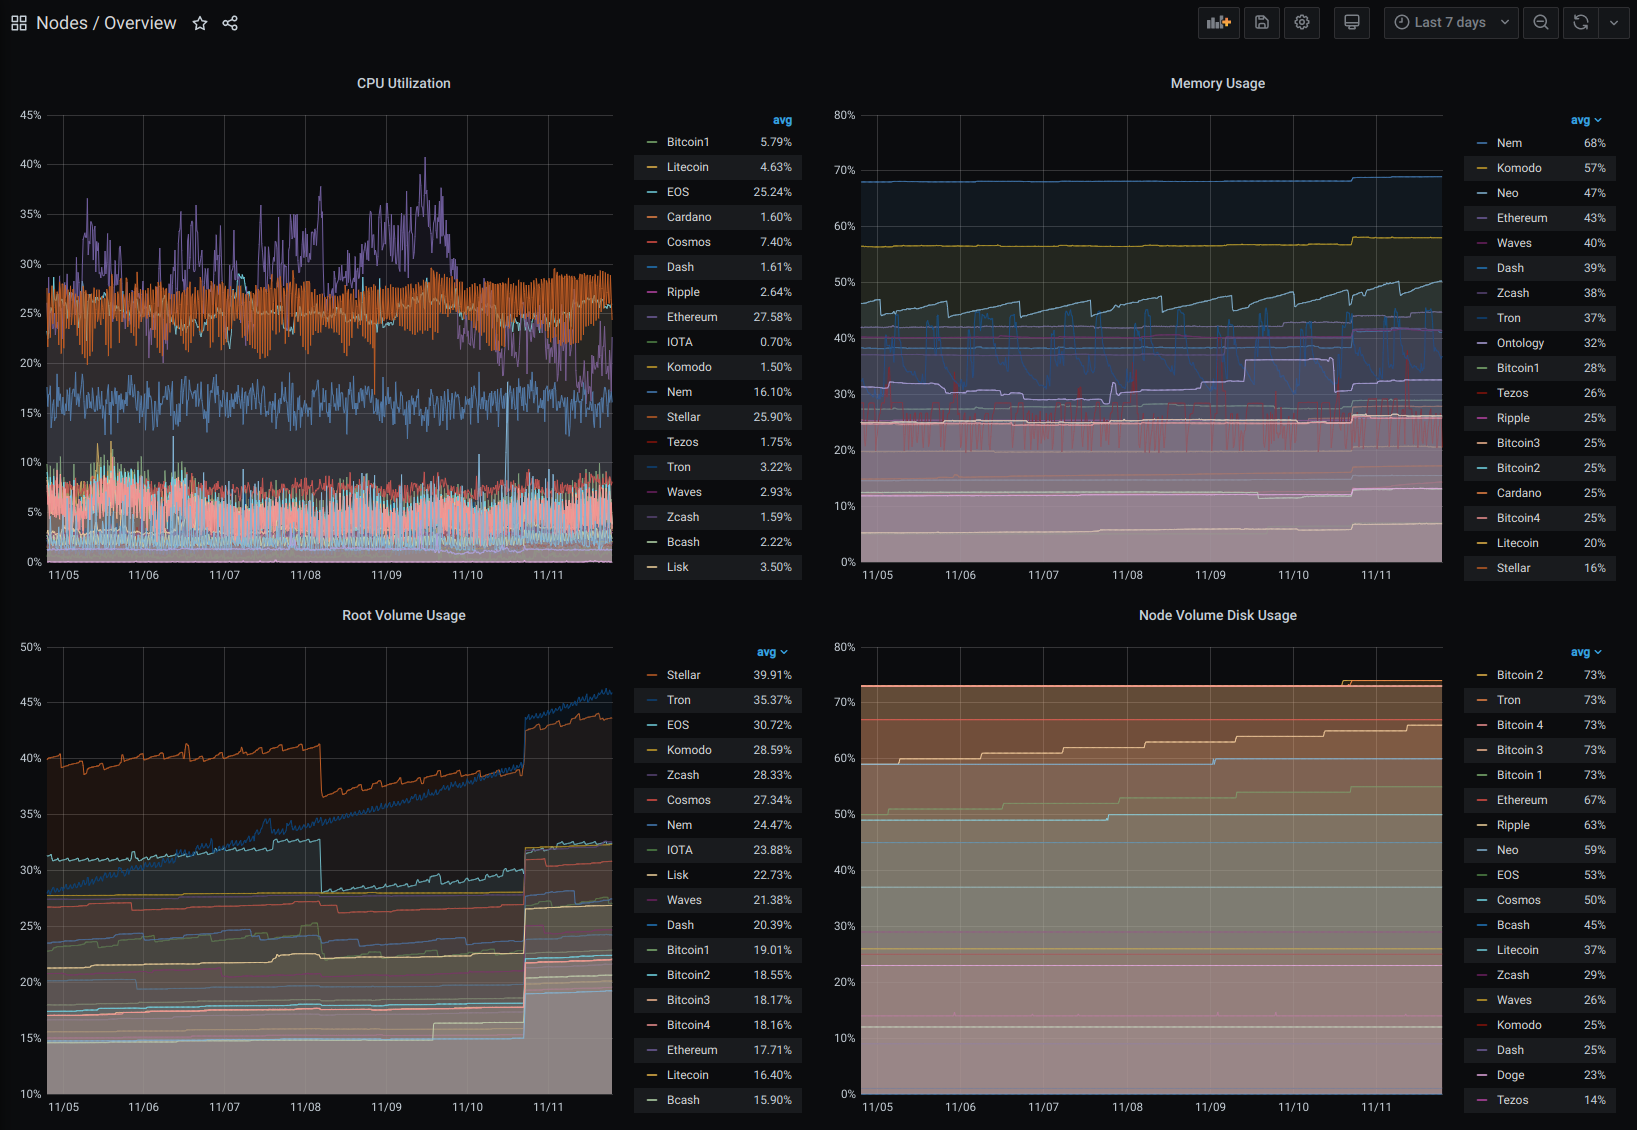
Now that we have our node up and running it is important to keep it that way. Apart from sending the logs of the nodes to our centralised logging platform Graylog, where our developers can inspect and debug problems, we are also collecting custom metrics to get the current block height or equivalent (like milestones in IOTA) - amongst others - to CloudWatch. Below, you can see an excerpt of our block height and central monitoring dashboard for our nodes:
Additionally, we have alerts for all the important metrics, like one node is not syncing anymore or the hard drive is running out of space or similar, in place. Fine-tuning these thresholds is important to avoid any false positives in the alerting system.
No end in sight

Keeping up to date with the fast-paced development in all of the major cryptocurrency projects is a real challenge. As we are currently supporting more than 25 different coins on our platform, we have to always be up to date about the latest network upgrades or upcoming hard forks. To help us with this task we are using a dedicated Slack channel, including an automatic GitHub watch bot, which notifies us about upcoming releases. If a new release is announced, our dedicated blockchain team will take a look at the changes and, if needed, prepare the upgraded configuration of the docker image and also changes in the application code itself. But how do we get these node updates in a secure way to our instances?
SSM to the rescue!
As security is one of the pillars of the Bitpanda infrastructure, we don't have any open connection or similar on any of these instances, so how do we connect? AWS provides Systems Manager (SSM) installed by default on all Amazon Linux 2 AMIs, which allows us to run any command on any enabled instance. Additionally, we don't have to care about any SSH Keys and can grant or revoke permissions only to certain IAM Roles in a centralised place (IAM). To upgrade our nodes with Gitlab CI and SSM, one of our example commands, would look like the following:
$ cmd="systemctl stop node@* && systemctl start node@$TAG_VERSION" $ aws ssm send-command --instance-ids <instance-id(s)> --document-name "AWS-RunShellScript" --parameters commands="$cmd"
#when moon?
As with any platform, there is always room to improve, so we are now looking into automating maintenance tasks, like resizing the EBS volume when the blockchain reaches a certain threshold or reacting to a stuck node through custom lambda functions, which we will highlight in one of the upcoming blog posts. This would enable us to build a self-healing system, where little to no human intervention is needed and greatly reduces the operational overhead.
If you are, after this long post, still reading this, I hope you got a good feeling about what it takes to run a cryptocurrency platform on that scale, so you, as a customer, can benefit from the convenience of sending and receiving cryptocurrencies in a matter of seconds to anyone in the world.